Feeds:
Posts
Comments

Archive for the ‘Kid’s crafts’ Category

Here’s the beginning of a new segment- hopefully these will be short and sweet.  I’m going to call it “My Spin on the Pin” since they’ll be inspired by things I’ve pinned on pinterest.  However, since I rarely do anything exactly as presented, you’ll be able to see or get a brief description of the changes.

So without further ado…  my first “Spin on the Pin.”

Salt dough fingerprint ornaments- this takes 2 of my pins.


Pin #1 is a Cinnamon salt dough recipe that can be found at grouprecipes.com.  A basic salt dough recipe plus some cinnamon for scent/color.

Pin #2 is a cute christmas ornament using thumb prints for the ornaments on the tree, found over here at Home Life Simplified.  (Warning- no instructions, just a link to a pin, that will not load for me).

fingerprint salt dough ornaments

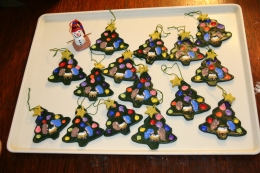
I added a manger scene in fingerprints (sides of thumbs for Mary and Joseph, sides of pinkies for baby Jesus).

fingerprint ornament close

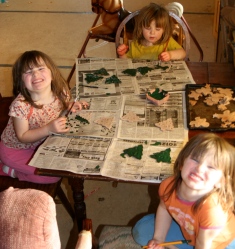
This was my first (stressful!) attempt at making Christmas ornaments with my girls (twins 4+, little sister almost 3).  They got to help with most of the stages- making the salt dough, helping with rolling and cutting out the ornaments, adding their fingerprints, painting the tree green and the stars yellow, and painting in the dots (Q-tips, 1 color at a time, 1 child at a time helped here).  I served as project manager and quality control, plus baking, painting details, sealing, and stringing.

3 painters

(IF you want the fingerprints to be visible in detail, I think I’d go with a polymer clay, unless you have an excellent no-puff, detail-able salt dough recipe.)

They had lots of fun, and I think they turned out pretty cute!

There’s also some gingerbread men and stars waiting in the wings to be completely finished- I left the girls unrestrained in their paint application and I think they’ll need some Q-tip dots to give them a cleaner look- we’ll see what happens.

That cute little snowman has a bit of a tilt, but he’s SUPPOSED  to look like a marshmallow snowman on a graham cracker, if you’ve seen any of those cute little guys out there in the stores…

**** If you’re a relative and you get one of these, pretend you didn’t see it first here 😉

Read Full Post »

Nothing too original with this one- I just followed the directions over at Somewhat Simple.

Cut the bottom off of a bottle and put a baby sock over the bottle (enclosing the hole you made by cutting off the bottom). Dip it in straight dish soap (in any container with a flat bottom that will accommodate your bubble snake).  I used the super cheap stuff from the dollar store.


For each kid at VBS, they got 5 minutes to color an infant sock with permanent markers (put the sock on the bottle, then color).  Then we spent the rest of the time blowing bubbles for our last night of VBS.  Each crew was different.  One group competed for longest snake, another group worked together to make a giant bubble pile/cloud on the ground, some just ran around and blew their bubbles.


Pre-school age kids are most likely to breath IN when they put their mouth on the bottle, so encourage them to only blow out, or they’ll get bubbles in their mouth.

These were super simple, but tons of fun for all ages!  They’ve seen a lot of use at my house this summer!

Read Full Post »

These butterfly notebooks were the craft for day 4.  With school upcoming, this seemed like a fun and practical craft that should really be useful.  I made some other versions for my girls at home- definitely a neat back to school craft as well.

They are a bit time consuming to prepare, but it’s a neat craft that sticks nicely to the butterfly as a theme for the Resurrection (the bible story for the 4th day of VBS).

I got spiral notebooks at the back-to-school sales.  Clear re-positionable contact paper comes in a roll 18″x24′.  I think other sizes were also available.

My butterfly was really a simplified blown up version of a butterfly stencil.  The copier did all the hard work for me to size it, then I just transferred it onto a piece of cereal box to make a stencil.  Of course, any object will work, or letters.  Use your stencil to trace your shape, or free hand it.

Small scissors or an exacto knife work well for cutting out the shapes, but I had a free-form shape cutter that I’d used for one of my crafts last year (someday I’ll post about it) that sped things up quite a bit to make the number I needed.  I couldn’t cut them out completely with the free-form cutter since the base of the cutter wouldn’t go over the spirals in the notebook, but it was simple to cut the rest of the wings with scissors.  Whatever shape you use, remember to keep them simple if you have a lot to do!


Once the shape is cut out, you move on to the contact paper.  I put on the outside layer for each notebook and left the paper backing inside so that it wouldn’t adhere to the first page.  This stuff is forgiving and re-positionable, especially for the outside piece.  The size of  your piece will vary based on the size of your cut-out shape.  Just make sure it overlaps your shape by at least 1/2″ or so.  I cut the inside piece of contact paper and slipped it into each notebook for after the kids decorated them.


Regarding applying that piece of contact paper, you can take the whole backing off and set it on like a giant sticker- reasonably easy to do.  But for the kids to do it (and maybe adults, too- whatever you prefer), this is a better method:  Start to remove the backing from one edge of the contact paper.  Set it on the cut out shape and adhere the edge, make sure the whole piece sits squarely over the cut-out.  Then pull the loose edge of the paper backing from underneath the contact paper and smooth it down as you pull off the backing. I did “burnish” the surface to get it to stick better once it was properly placed, but only for the front- the kids didn’t burnish the inside.   To burnish I used the handles of my scissors to rub the contact paper and get it to adhere better to the notebook.


Now for some inside decoration.  I used shaped paper punches (butterflies, stars, helicopters, and planes) and fine glitter in the little shaker containers.  I punched a full 8 1/2″x11″ paper of each, and for 66 kids that was sufficient.  It also kept things simpler with only one color choice for each punched shape.  Adults handed out the shapes to the kids- a small pinch of punched shapes goes a long way.  I handed out the last of my stars and almost all my butterflies to the last crew that came through, but no one lacked any.  Stick the paper punch outs on first, then the glitter.  Don’t get too crazy with the glitter, or less of the contact paper will stick.  Also, be sure to brush off excess glitter from the inside cover before trying to put on the contact paper so it has more places to adhere to seal in all those decorations.

I tried crayon shavings at home and melted them with an iron after I put the contact paper on.  They turned out okay, but the melted crayons aren’t an appealing look where they seep into the notebook cover.  It’s most obvious around the clown nose below.

Once the decorations are in and the cover is swept clear of excess glitter, The inner piece of contact paper can be put on. (Review directions above for the easiest way for the kids to apply the contact paper themselves, or at least help.)

Done!

Read Full Post »

So I tried yet another homemade play dough recipe the other day.  But this one was better than any I’ve tried before- as close to the “real” thing as I think you can get.  It even works in those silly play dough machines.  I saw it on pinterest and checked it out at Modern Parents Messy Kids.  Click here for the full post and recipe instructions.  Here’s what you’ll need:

1 c flour

1 c warm water

2 T salt

2T cream of tartar

2T cooking oil

1-3 oz pack of Jello


It all goes into the pot, gets mixed thoroughly, and cooked. Then cool and knead.  If you’ve made cooked play dough before, you know the drill.  If not, make sure you check out MPMK for the full tutorial.

I tried it with unflavored gelatin (like Knox) as well, and it turned out just as wonderful. Use 1-1oz package or 1 Tablespoon if you’ve bought it in bulk like I have.

This is now my go-to recipe!  Hope you like it as much as I do.

Read Full Post »